Category: Kitchen

  • The Best Champagne Glasses for Your Next Celebration

    The Best Champagne Glasses for Your Next Celebration

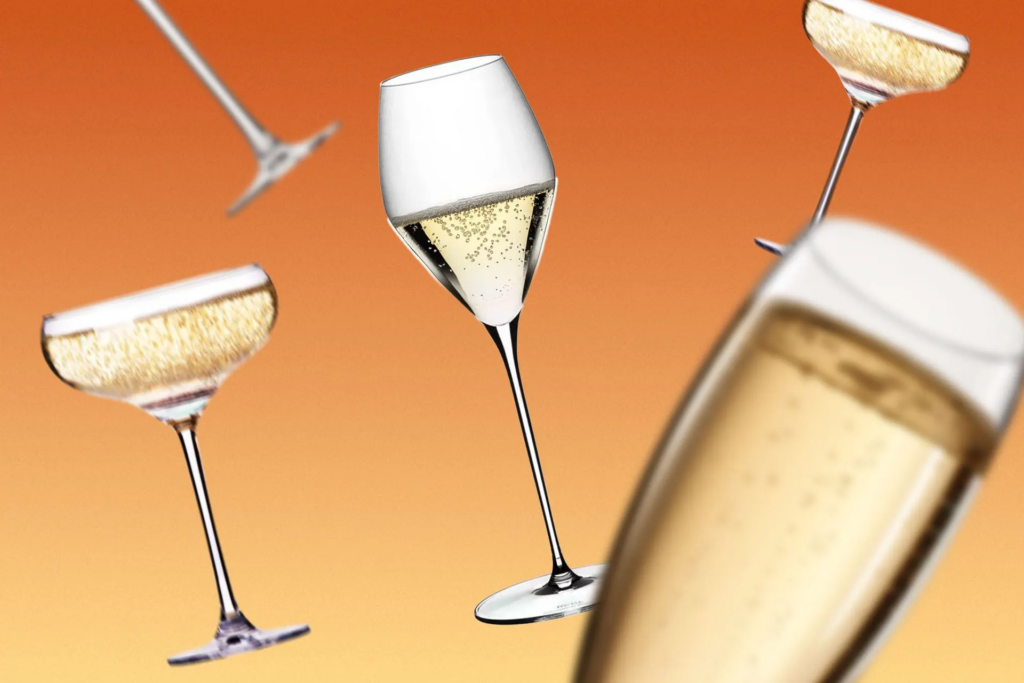
    When it comes to enjoying a beautiful bottle of fizz, the glass you choose matters just as much as the wine itself. As Beth Bond, head sommelier at The Cottage in the Wood, explains, “Champagne is exciting, so when a dainty, elegant glass is brought out, you know something special is about to happen. If you were to pour into a thick glass, it would not feel the same.”

    However, navigating the world of stemware can be overwhelming. From vintage Gatsby-era coupes to modern stemless designs, every shape drastically alters the temperature, aroma, and perlage (the streams of bubbles) of your drink.

    Whether you are preparing for a massive New Year’s Eve bash or an intimate anniversary toast, here is our expert-curated guide to the absolute best Champagne glasses you can buy right now.

    The 5 Best Champagne Glasses to Elevate Your Toast

    1. Best Stemless Option: Halden Champagne Flutes (The White Company)

    • Price: £50 (Set of 4)
    • Why We Love It: If you hate the anxiety of washing incredibly delicate stems, these hand-blown, lead-free crystal glasses are a lifesaver. They feature a chunky, heavy base that prevents the heat of your hand from warming the Champagne while offering unmatched durability for rowdy parties.

    2. Best Modern Tulip: Sky Champagne Flutes (Georg Jensen)

    • Price: £70 (Set of 6)
    • Why We Love It: Designed by French visionary Aurélien Barbry, these sculptural, curved tulip glasses perfectly balance minimalism and practicality. The tulip shape gives complex Champagnes room to breathe, and miraculously, they are completely dishwasher safe.

    3. Best Vintage Glamour: Mikasa Treviso Coupe Glasses (Lakeland)

    • Price: £39.99 (Set of 4)
    • Why We Love It: If you want to channel the roaring 1920s, you need a coupe. These softly ribbed saucer glasses are the epitome of vintage glamour. While coupes do cause Champagne to lose its bubbles faster, they are absolutely unmatched for serving elegant sparkling cocktails.

    4. Best for True Enthusiasts: Wine Master Flutes (Dartington Crystal)

    • Price: £60 (Set of 2)
    • Why We Love It: Hand-crafted in the UK, these lead crystal flutes were designed with one goal: to present the wine’s authentic flavors. The sleek, defined shape and smooth rim perfectly channel the aromas of vintage Champagnes directly to your nose.

    5. Best Budget-Friendly Option: Vintage Coupe Glass (ProCook)

    • Price: £14 (Set of 2)
    • Why We Love It: There is no need to splash massive amounts of cash if you only drink Champagne once a year. These pocket-friendly crystal glass coupes feature sturdy bases and generously sized bowls, making them perfect for casual toasts.

    Sommelier Shopping Advice: How to Choose the Right Shape

    If you are unsure which style suits your drinking habits, here is a quick breakdown from the experts:

    • The Flute (Tall and Narrow): The ultimate choice for preserving bubbles. Flutes funnel the aromas efficiently and maintain maximum effervescence, making them perfect for youthful Champagnes and quick toasts.
    • The Tulip (Wide Bowl, Narrow Rim): The preferred choice of most sommeliers. The broader bowl allows complex, aged Champagnes to interact with oxygen and open up, while the narrow rim still traps the essential bubbles and aromas.
    • The Coupe (Short and Wide): The original Champagne glass! While their massive surface area causes fizz to go flat quickly, they are the undisputed champions of black-tie aesthetics and sparkling cocktails.
    • Stemless (No Stem): Highly durable and practical for massive, casual events. However, because you are forced to hold the bowl, the heat from your hand will inevitably warm the wine much faster than a stemmed glass.

    A Note on Materials: For everyday use, look for tempered glass. However, if you want the ultimate sensory experience, invest in lead-free crystal. Crystal can be spun much thinner than regular glass, offering a delicate rim and brilliant clarity that truly honors the wine inside.

  • How to Choose the Best Size Air Fryer for Your Household

    How to Choose the Best Size Air Fryer for Your Household

    Air fryers have quickly become an unrivaled kitchen gadget, with many households completely replacing their traditional ovens with this new-age piece of kitchen tech. If you are hesitating to invest in this handy appliance, it is likely because you are overwhelmed by the options and wondering what the best size is for your specific household.

    Air fryers come in a massive variety of sizes. Some are perfectly compact for making a quick batch of crispy chicken nuggets, while others are large enough to prepare a full three-course meal. Whether you are cooking for one, feeding a large family, or looking to streamline your batch cooking sessions, here is an expert-backed guide to choosing the perfect air fryer.

    How Much Space Do Air Fryers Take Up?

    If you live in an apartment, you know that every single inch of kitchen counter space counts. Fortunately, there are multiple size categories that can squeeze into even the slimmest of corners.

    Smaller air fryers (the 2 to 4-liter models) have a footprint similar to a standard 4-slice toaster. On the other end of the spectrum, larger, family-sized models (6+ liters) will take up about as much space as a small microwave.

    The Ultimate Air Fryer Size Guide

    • Small (1–3L) | Perfect for singles or couples: These compact fryers are best used for cooking single portions perfectly or for quickly preparing after-school snacks when you don’t want to fire up the oven. Recommended: Daewoo Compact Manual Air Fryer.
    • Medium (3.5–5L) | Perfect for families of 2–3: If you have a little extra counter space, a medium fryer makes preparing full meals simple and prevents you from accidentally overfilling your basket. Recommended: Ninja 3.8L Air Fryer.
    • Large (5.5–7L) | Perfect for families of 4+: Choosing an air fryer in the 5 to 6-liter range will easily accommodate larger portions and make weeknight dinner prep a total breeze. Recommended: COSORI CP158 Air Fryer.
    • Extra-Large (7L+ / Dual Basket) | Perfect for batch cooking or entertaining: A dual-drawer or stacked model is incredibly practical. A single person can use just one drawer for everyday meals, while utilizing the second drawer when guests come over. A family can run both drawers simultaneously with completely different foods! Recommended: Daewoo 10L Mega Drawer Air Fryer.

    Is a Dual Basket Better?

    “Better” is entirely subjective, but are they more versatile? 100%.

    Dual basket air fryers are explicitly designed to cook multiple items at once. They are ideal for meal prepping, cooking different dinners for fussy children, or simply preparing your protein and your roasted vegetables at the exact same time. The dual function allows you to set one basket to reach a completely different temperature than the other, taking the stress out of complex, layered meals.

    If you are on the fence, models like the Salter Fuzion Dual Air Fryer offer a versatile compromise, allowing you to convert dual drawers into one large single drawer for dinner parties. Just keep in mind that dual basket air fryers take up the most countertop space in the kitchen!

    The Dangers of Overfilling

    If you often feel your air fryer isn’t working to its full potential, you are likely overfilling it! Experts note that stuffing the basket too full is the most common mistake new users make.

    Overfilling prevents the hot air from circulating properly around the food, leading to uneven cooking and soggy, undercooked meals. If you consistently find yourself running out of room, it is time to upgrade to a bigger capacity or a dual basket model so your food cooks to crispy perfection every single time.

  • How to Clean an Air Fryer: The Ultimate Step-by-Step Guide

    How to Clean an Air Fryer: The Ultimate Step-by-Step Guide

    Many of us rely on our air fryers daily to whip up quick meals, heat leftovers, and feed the family. However, with heavy use comes the inevitable buildup of grease, crumbs, and lingering food odors.

    While you don’t necessarily have to scrub it down after every single use, regular cleaning is essential. Leftover food and grease can obstruct airflow, leading to uneven cooking times, foul tastes, and even potential fire hazards. Keep your appliance spotless and performing at its best with this expert-backed, step-by-step cleaning guide.

    The Step-by-Step Cleaning Guide

    Step 1: Unplug and Cool Down Safety first! Always ensure your air fryer is completely unplugged and has had plenty of time to cool down before you begin cleaning. Since cleaning methods can vary between brands, it is also a good idea to quickly check your appliance’s manual for any specific manufacturer guidelines.

    Step 2: Wash the Basket and Tray Check your manual to see if the basket and drip tray are dishwasher safe. If they are, popping them in the dishwasher is the easiest way to get a thorough clean.

    • Hand Washing: If you need to wash them by hand, use warm water, dish soap, and a soft-bristled brush to gently scrub away grease.
    • Baked-On Food Hack: For stubborn, stuck-on grime, fill the basket with warm water, drop in a standard dishwasher tablet, and let it soak for one to two hours before rinsing.

    Step 3: Wipe Down the Interior and Heating Element Using a damp microfiber cloth or wet paper towel, gently wipe out the inside of the machine.

    • The Heating Element: Do not forget this part! Food particles and grease can easily accumulate on the heating element, affecting performance and creating a fire hazard. Use a soft brush to carefully remove debris.
    • The Seals: Gently scrub the rubber seals where grease and odors love to hide, then make sure they are securely reattached.

    Step 4: Clean the Exterior and Controls The outside of your air fryer might not be greasy, but it can quickly collect fingerprints and dust. Wipe down the exterior housing and the handles with a damp microfiber cloth. Be extra careful around the digital screens and buttons to avoid causing moisture damage to the electronics.

    Step 5: Dry Completely Before Reassembling Before you put the basket back into the main unit, ensure every single component is 100% dry. Trapped moisture inside a closed air fryer can lead to rust and bacterial growth.

    Deep Cleaning & Odor Removal

    If you frequently cook sticky or greasy foods (like bacon or wings), you will need to deep clean your appliance every few uses.

    • To Remove Stubborn Grease: Create a thick paste using water and baking soda. Apply the mixture to the greasy areas inside the fryer and use an old toothbrush to gently scrub the buildup away. Wipe clean with a damp cloth, followed immediately by a dry towel.

    Important Warning: Do not mix baking soda and vinegar to clean the interior of your air fryer! While this combination is popular for household cleaning, the resulting chemical reaction can damage the protective coatings inside the appliance. Stick to baking soda and water.

    • To Banish Lingering Odors: If your air fryer still smells like last night’s fish, place a small heat-safe dish filled with equal parts white vinegar and lemon juice into the basket. Run the air fryer on a low temperature for 5 to 10 minutes to neutralize the smell.

    Pro-Tip: Prevent Grease Buildup

    The easiest way to clean an air fryer is to prevent it from getting dirty in the first place! If you are cooking something particularly messy, invest in disposable or reusable silicone air fryer liners to catch the drippings and protect the bottom of the basket.

  • Stand Mixer vs. Hand Mixer: Which Should You Choose?

    Stand Mixer vs. Hand Mixer: Which Should You Choose?

    Whether you are a keen amateur chef or an occasional cake baker, a good mixer is an absolute essential for your kitchen toolkit. These handy appliances make light work of mixing dough, whipping cream, and whisking up fluffy meringues. But when it comes time to upgrade your kitchen, you are faced with a classic dilemma: should you choose a stand mixer, a hand mixer, or even both?

    The right choice entirely depends on your budget, storage space, and cooking style. Here is a practical, comprehensive guide to help you choose the best food mixer for your culinary needs.

    What is the Difference?

    Before diving into the pros and cons, it helps to understand the core differences between the two appliances:

    • Hand Mixer: A compact, handheld electric mixer that you manually hold over a bowl. It is designed for quick, everyday tasks like whipping cream or making simple batters.
    • Stand Mixer: A heavy-duty electric mixer attached to a sturdy base that sits on your worktop. It holds the bowl in place for you and often features a powerful motor and various attachments for heavy-duty baking and food prep.

    The Case for the Stand Mixer

    Stand mixers are the ultimate kitchen workhorses. With powerful motors (aim for at least 600W) and heavy, robust frames, they are built to tackle large batches and stiff mixtures without skipping a beat.

    Because they hold the bowl securely in place, stand mixers operate completely hands-free. This allows you to multitask in the kitchen and add ingredients on the fly without having to turn the machine off. Furthermore, brands like KitchenAid feature a power hub that transforms the mixer into a multi-use appliance, capable of churning ice cream, rolling pasta, or even grinding meat.

    Pros of a Stand Mixer:

    • Solid, stable, and robust design.
    • Highly powerful motors with up to 10 precise speed settings.
    • Hands-free operation saves your arms from fatigue.
    • Capable of heavy-duty tasks like kneading thick bread dough.
    • Available in beautiful colors and designs that act as a kitchen style statement.

    Cons of a Stand Mixer:

    • Heavy and difficult to move in and out of cupboards.
    • Requires dedicated worktop space.
    • Significantly more expensive (ranging from £75 up to £1,000).
    • Can be fiddly to clean, though many feature dishwasher-safe bowls.

    The Case for the Hand Mixer

    If you have a compact kitchen or only bake occasionally, a hand mixer might be your perfect match. These lightweight appliances are incredibly convenient for rustling up small batches of ingredients.

    One of the biggest advantages of a hand mixer is its portability. You can mix directly inside any container—whether it is a mixing bowl, a saucepan on the stove, or a measuring jug—which drastically cuts down on your washing up. They are also incredibly easy to clean; simply pop the beaters in the dishwasher and wipe down the main unit.

    Pros of a Hand Mixer:

    • Lightweight, portable, and incredibly easy to store in a drawer.
    • Perfect for quick tasks like whipping cream or beating eggs.
    • Highly affordable (basic models start around £10).
    • Mix directly in your own pots and pans.
    • Cordless hand mixer models offer even more freedom around the kitchen.

    Cons of a Hand Mixer:

    • Requires physical effort; your arm may ache during long mixing sessions.
    • Less powerful motors can struggle with dense, stiff doughs.
    • Ties up both of your hands while in use.
    • Fewer speed settings and attachment options.

    Head-to-Head Comparison

    FeatureStand MixerHand Mixer
    Best ForFrequent bakers, large batches, heavy bread dough.Occasional bakers, small batches, quick whipping.
    Storage NeedHigh (Usually stays on the counter).Low (Easily fits in a drawer).
    Physical EffortZero (Hands-free operation).High (Requires holding the unit and bowl).
    Price Range£75 – £1,000+£10 – £180
    VersatilityHigh (Pasta rollers, meat grinders, etc.).Low (Usually just beaters and dough hooks).

    The Final Verdict: Which is Best?

    Choose a Hand Mixer if: You bake in small batches, have limited kitchen storage, are on a strict budget, and primarily need a tool for light batters and whipping.

    Choose a Stand Mixer if: You regularly cook for a crowd, bake dense bread doughs, want hands-free convenience, and have the worktop space to display a beautiful appliance.

    The Ideal Scenario: If your space and budget allow, having both types of mixers in one kitchen offers maximum flexibility. You can grab the hand mixer for a quick weekday whipped cream, and rely on the stand mixer for your weekend baking marathons!

  • How to Season a Carbon Steel Pan: A Step-by-Step Guide

    How to Season a Carbon Steel Pan: A Step-by-Step Guide

    So, you just invested in a brand new carbon steel pan, but the surface feels rough, and your eggs are sticking like glue. Don’t panic! Before you can achieve that coveted, slide-around-the-pan non-stick perfection, you have to season it.

    Seasoning is the crucial process of baking oil into the metal to create a natural, slick patina that prevents rust and makes cooking a breeze. If you are unsure where to start, here is a complete, easy-to-follow guide on exactly how to season your carbon steel pan like a pro.

    Why Do You Need to Season Carbon Steel?

    Unlike Teflon-coated pans that degrade over time, carbon steel actually gets better the more you use it. However, out of the box, the raw iron and carbon blend is highly susceptible to rust and sticking.

    Seasoning bonds cooking oil to the iron at a molecular level (a process called polymerization). This creates a hard, protective, non-stick layer. Over time, your pan will transition from a shiny silver to a deep, beautiful black patina.

    Choosing the Right Oil

    Before you begin, you need the right oil. You must choose an oil with a high smoke point that can withstand intense heat without burning away.

    • Best Oils to Use: Grapeseed oil, avocado oil, canola oil, soybean oil, or sunflower oil.
    • Oils to Avoid: Butter, extra virgin olive oil, or unrefined coconut oil (their smoke points are too low and will burn, leaving a sticky residue).

    The 7-Step Seasoning Process

    Step 1: Remove the Protective Coating Most new pans ship with a thin layer of beeswax or factory oil to prevent rust during transit. You must remove this before seasoning. Scrub the pan vigorously using very hot water, dish soap, and a non-abrasive sponge until the metal feels completely bare.

    Step 2: Dry the Pan Completely Towel dry the pan, then place it on the stove over low heat for a few minutes. This ensures every microscopic drop of moisture evaporates, preventing trapped water from causing rust under your new seasoning layer.

    Step 3: Heat the Pan Turn the burner up to medium-high heat. Let the dry pan sit for 5 to 10 minutes until it is thoroughly heated. This opens up the metal’s pores so it can properly absorb the oil.

    Step 4: Apply the Oil (Sparingly!) This is the most important step. Apply a few drops of your chosen high-smoke-point oil to a paper towel. Carefully wipe the entire surface of the pan—inside, outside, and the handle.

    • Crucial Tip: You want the thinnest layer possible. After applying the oil, take a clean paper towel and wipe the pan down again as if you made a mistake and are trying to remove all the oil. If the oil goes on too thick, your pan will end up sticky and splotchy.

    Step 5: Burn It On Place the oiled pan back on the stove over high heat. Leave it there until the oil begins to smoke heavily (ensure your kitchen is well-ventilated!). Let it smoke for about 10 minutes until the smoke subsides and the pan begins to change color. Turn off the heat and let the pan cool completely.

    Step 6: Repeat the Process One layer is rarely enough for a brand new pan. For the best non-stick results, repeat Steps 3 through 5 at least two or three more times to build a solid foundational patina.

    Step 7: Cook and Maintain! The absolute best way to build your seasoning is simply to cook with the pan! Frequent use with cooking fats will naturally deepen the black patina over time.

    How to Clean Your Seasoned Pan

    Once your pan is seasoned, do not use harsh soaps or wire scrubbers.

    1. Rinse the pan with hot water.
    2. Gently scrub away food particles with a soft brush or coarse sea salt.
    3. Dry the pan completely on the stove over low heat.
    4. Wipe a microscopic layer of oil over the cooking surface before storing it to prevent ambient moisture from causing rust.

    Also Read : Carbon Steel vs. Cast Iron: The 2026 Heavyweight Skillet Showdown

  • LPG vs. Induction Stove: Which is Better for Your Kitchen?

    LPG vs. Induction Stove: Which is Better for Your Kitchen?

    Modern households are increasingly opting for induction stoves due to their sleek design and quick heating abilities. However, Liquefied Petroleum Gas (LPG) still firmly holds its ground as the reigning champion in many Indian kitchens.

    If you find yourself caught in the great “LPG vs. Induction” debate and are wondering which option is cheaper or more efficient for your daily cooking, here is a comprehensive breakdown of why traditional gas might still be your best bet.

    5 Reasons Why You Should Choose LPG Over an Induction Stove

    1. Faster Cooking and High Energy Output LPG has a significantly higher calorific value compared to electricity, meaning it delivers more energy per unit of consumption. LPG offers a calorific value of around 11,950 kcal/kg, in stark contrast to electricity’s direct conversion of around 860 kcal/kWh. Because LPG stoves provide instant, intense heat, boiling water or cooking meals can often be much faster than waiting for an electric element to reach peak temperature.

    2. Unmatched Versatility and Compatibility Many traditional Indian cooking techniques—such as tempering (tadka), roasting, and direct-flame grilling (phulkas)—are much more efficiently executed on an open flame. Furthermore, LPG stoves can accommodate a massive variety of cookware, including copper, aluminum, and clay pots. Conversely, induction cooking strictly requires specialized pots and pans with a magnetic, ferromagnetic bottom to function at all.

    3. Lower Initial Costs and High Accessibility While the daily cost of using LPG versus electricity varies by region depending on utility rates, LPG is often more cost-effective in the long run, especially during peak hours when premium electrical tariffs apply. Additionally, the initial setup is much cheaper. LPG stoves are generally highly affordable and do not require the specialized heavy-duty electrical wiring that high-wattage induction cooktops demand.

    4. Immediate Control and Heat Distribution Professional chefs prefer gas for a reason: it provides immediate, precise control over flame intensity. This allows for rapid temperature adjustments right in the middle of the cooking process. Because the flame physically wraps around the bottom of the pan, LPG also allows for even heat distribution on curved cookware like woks and kadhais, which struggle on the flat glass surface of an induction stove.

    5. Reliability During Power Outages Despite ongoing advancements in India’s electricity generation and distribution grid, many areas—especially rural and remote regions—still grapple with inconsistent power supplies and frequent load shedding. LPG is a highly portable and storable fuel, presenting a completely reliable alternative that ensures your family’s dinner is never delayed by a blackout.

    The Final Verdict: Why You Need a SUPERGAS Connection

    In the ongoing discussion of gas cylinders vs. induction stoves, it is clear that LPG remains the preferable choice for the average Indian household, offering safety, cost-effectiveness, and total culinary flexibility.

    However, the key to maximizing these benefits lies in choosing the right supplier. SUPERGAS stands out as the ideal partner for your kitchen needs:

    • Punctual Delivery: With a promise of on-time and anytime delivery across a vast network, you are assured never to face cooking delays.
    • Uncompromising Safety: A strict commitment to safety standards benefits employees, customers, and end-users alike.
    • Complete Support: From providing new connections within 24 hours to installing advanced leak detection systems, SUPERGAS ensures total peace of mind.

    Also Read : Carbon Steel vs. Cast Iron: The 2026 Heavyweight Skillet Showdown

  • Smart Kitchen Faucets 2026: Slashing Your Water Bill with Style

    Smart Kitchen Faucets 2026: Slashing Your Water Bill with Style

    If your kitchen sink is secretly draining your budget faster than your streaming subscriptions, you aren’t alone. Most homeowners don’t realize the average faucet is accessed dozens of times a day, leading to a massive cumulative waste through “ghost flows”—those extra seconds the water runs while you reach for a towel or scrub a stubborn pan.

    In late March 2026, the smart kitchen has moved beyond simple “voice-activated gimmicks” into the realm of Precision Resource Management. Upgrading to a smart faucet is no longer just about feeling like you’re on the bridge of a starship; it’s a strategic metabolic fix for your home’s utility efficiency.

    The Tech: Beyond the Motion Sensor

    The 2026 generation of faucets has finally solved the “accidental activation” problem that plagued early touchless models.

    • Infrared & Ultrasonic Fusion: Leading models now use dual-sensor arrays to distinguish between a hand reaching for a sponge and a cat walking across the counter.
    • Matter 1.4 Integration: Your faucet now talks to your home hub. If your Matter-certified smart home system detects you’ve left the house but the kitchen flow is still active, it can trigger an emergency remote shutoff.
    • Timed Metering: Many high-end models from Moen and Kohler now feature “Fractional Dispensing,” allowing you to ask for exactly $250\text{ml}$ of water, eliminating the waste of overfilling.

    The Math: Calculating Your Water ROI

    How much can you actually save? The difference between an older 2.2 Gallons Per Minute ($GPM$) faucet and a modern EPA WaterSense certified smart model is staggering when calculated over a year.

    The formula for daily consumption ($D$) based on $n$ uses per day and $t$ time in minutes is:

    $$D = n \times t \times GPM$$

    If a standard family reduces their average run-time from $30\text{s}$ down to $10\text{s}$ per use (thanks to touchless shutoff) and drops the flow from $2.2\text{ GPM}$ to $1.5\text{ GPM}$:

    • Old System: $30 \text{ uses} \times 0.5\text{ min} \times 2.2\text{ GPM} = 33\text{ gallons/day}$
    • Smart System: $30 \text{ uses} \times 0.17\text{ min} \times 1.5\text{ GPM} = 7.6\text{ gallons/day}$

    That is a $77\%$ reduction in daily water waste. According to the EPA WaterSense program guidelines, switching to high-efficiency fixtures can save the average household over $700\text{ gallons}$ of water per year—the equivalent of $40$ showers.

    2026 Top Picks: A Comparative Analysis

    ModelKey TechBest ForFlow Rate
    Moen Smart FaucetMotion Control & VoiceThe Tech-Obsessed Cook$1.5\text{ GPM}$
    Kohler SensatePrecision InductionMinimalist Aesthetics$1.5\text{ GPM}$
    Delta Touch2OCapacitive TouchBudget-Conscious Savers$1.8\text{ GPM}$
    GROHE MintaPull-down SmartControlSerious Home Chefs$1.2\text{ GPM}$

    For a deep dive into how these models hold up under 2026’s rigorous durability tests, check out the Consumer Reports Guide to Kitchen Faucets.

    The Quiet Hero: Integrated Leak Detection

    While touchless sensors save water during active use, Leak Detection saves water during silence. A micro-leak of just $0.25\text{ gallons/hour}$—barely a drip—wastes over $2,000\text{ gallons}$ a year.

    Current 2026 models like the Moen U or Kohler Konnect feature internal pressure sensors that monitor for “micro-pulses.” If the pressure drops while the valves are supposedly closed, the app sends a notification directly to your phone. As noted by Home Innovation Research Labs, smart plumbing is the #1 way to prevent catastrophic secondary water damage in modern homes.

    Conclusion

    Smart faucets in 2026 are the perfect intersection of luxury and responsibility. By transitioning from a manual “always-on” habit to a sensor-driven “on-demand” system, you are taking a massive leap toward household sustainability without sacrificing the convenience of a high-end kitchen. Whether you’re trying to prevent the spread of raw chicken germs or just trying to lower your monthly utility bill, the smart faucet is an investment that pays for itself in both gallons and peace of mind.

    Also Read : Air Fryer vs. Convection Oven: The 2026 Nutritional Resilience Guide

  • Carbon Steel vs. Cast Iron: The 2026 Heavyweight Skillet Showdown

    Carbon Steel vs. Cast Iron: The 2026 Heavyweight Skillet Showdown

    As far as kitchen investments go, we are officially in the era of “buy it for life.” In March 2026, as we pivot away from disposable non-stick coatings and back toward heirloom hardware, the debate always circles back to two titans: Carbon Steel and Cast Iron.

    Both pans are essentially indestructible, can handle “rip-roaring” heat, and improve with age. But while they share a similar DNA of iron and carbon, their personalities in the kitchen are wildly different. One is a sturdy, reliable anvil; the other is a nimble, responsive blade. Choosing between them isn’t about which is “better,” but rather which one matches your cooking tempo.

    Molecular Makeup: Stamped vs. Molded

    The fundamental difference starts at the factory.

    • Cast Iron: These are poured into sand molds as a single piece of molten metal. This process creates a thicker, more porous surface. According to the Lodge Cast Iron manufacturing process, this results in a pan with significant “thermal mass.”
    • Carbon Steel: These are stamped from sheets of metal, then the handles are riveted or welded on. They contain roughly 99% iron and 1% carbon. Because they are pressed rather than molded, they are smoother and thinner. Insights from Misen’s Guide to Carbon Steel highlight that this makes them much more responsive to temperature changes.

    02. The Physics of the Sear: Thermal Retention

    Why does a steak crust better on cast iron? It comes down to the physics of heat capacity. The amount of heat energy ($Q$) a pan can hold is determined by its mass ($m$), the specific heat capacity of the material ($c$), and the change in temperature ($\Delta T$):

    $$Q = m c \Delta T$$

    Because a Lodge 10.25-inch skillet weighs nearly twice as much as a carbon steel equivalent, its $m$ value is much higher. This means when you drop a cold steak into the pan, the temperature doesn’t plummet. Conversely, a carbon steel pan is the “sports car” of the kitchen; it heats up faster and cools down the moment you turn the dial, giving you more control over delicate sears.

    03. Maintenance and the “Polymerization” Myth

    Both pans require “seasoning,” which is the process of fat polymerization. When oil is heated to its smoke point in the presence of iron, it undergoes a chemical reaction, transforming from a liquid into a hard, plastic-like solid that bonds to the metal.

    • Cast Iron: Usually comes pre-seasoned. The textured surface helps the seasoning “grip” better.
    • Carbon Steel: Often arrives with a protective beeswax coating that must be stripped before you start your own seasoning layers.
    • The Soap Debate: In 2026, we’ve finally killed the myth that soap ruins these pans. As long as you aren’t using lye-based 19th-century soap, a little Dawn is perfectly fine for a well-seasoned pan. The Science of Cooking on Cast Iron confirms that once the oil has polymerized, it is no longer “oil”—it is a distinct chemical layer.

    04. Comparison Matrix: At a Glance

    FeatureCast Iron SkilletCarbon Steel Pan
    WeightHeavy (~5–8 lbs)Light (~2–4 lbs)
    Heat RetentionExceptionalModerate
    ResponsivenessSlow to changeVery Fast
    ShapeHigh, straight sidesFlared, sloping sides
    Best ForBaking, deep-frying, thick steaksSautéing, omelets, fish, stir-fry
    Initial CostVery Affordable (~$20+)Moderate (~$70–$100)

    Conclusion

    If your kitchen only has room for one “forever pan,” start with a classic Serious Eats-recommended Lodge Cast Iron. Its versatility for baking cornbread and searing heavy proteins is unmatched for the price. However, if you find the weight of cast iron cumbersome or you love the “flip” of a sauté, carbon steel is your best friend. In the high-stakes world of 2026 home cooking, having both in your arsenal is the ultimate power move. They don’t just cook food; they curate it, getting better with every meal you make.

    Also Read : Stainless Steel vs. Cast Iron: Architecture for the 2026 Resilient Kitchen

  • Stainless Steel vs. Cast Iron: Architecture for the 2026 Resilient Kitchen

    Stainless Steel vs. Cast Iron: Architecture for the 2026 Resilient Kitchen


    TL;DR / Summary Block

    Quick Summary: In 2026, cookware isn’t just about utility; it’s about Nutritional Resilience.

    • Cast Iron: The “Biological Hero.” Best for slow-cooking, heat retention, and naturally supplementing iron levels.
    • Stainless Steel: The “Precision Tool.” Essential for non-reactive cooking (acidic foods) and rapid-heat stir-fries.
    • 2026 Context: With India facing a 38°C heatwave today, energy-efficient heat retention ($T_r$) and easy maintenance are key to a resilient lifestyle.

    The Hook

    It is Thursday, March 26, 2026. As millions celebrate Ram Navami and others navigate the early-season heatwave in Kerala, the efficiency of our kitchens has become a pillar of personal resilience. With the global stainless steel cookware market hitting its projected $3.8 billion mark this year, the choice between the sleek elegance of steel and the rustic power of iron is no longer just aesthetic—it’s a bio-hacking decision for your long-term health.

    The Modular Body

    I. The Thermal Retention Formula ($T_r$)

    To determine which pan suits your 2026 energy-saving goals, we look at the Thermal Retention Index. This formula balances the material’s Heat Capacity ($H_c$) and the Duration of heat release ($D$) against the Energy Input ($E$) required:

    $$T_r = \frac{H_c \times D}{E + 1}$$

    • Cast Iron ($T_r$ High): It takes longer to heat up (higher $E$), but once hot, it stays hot. This is perfect for the 2026 “Slow Food” movement, allowing you to turn off the flame early and let the residual heat finish your dal makhani.
    • Stainless Steel ($T_r$ Moderate): It heats and cools rapidly. This is the “Rapid Response” tool for the busy professional who needs a quick stir-fry before a meeting.

    II. Biological & Nutritional Impact

    Your cookware is a direct participant in your Immune Resilience.

    • The Iron Spike: Cooking in cast iron can leach functional iron into your food. For those managing Heavy Menstrual Bleeding or anemia in 2026, this is a non-invasive nutritional win.
    • Non-Reactive Safety: Stainless steel (specifically 18/10 grade) is non-reactive. When cooking acidic Indian staples like tomato-based rasam or vinegar-heavy vindaloo, steel ensures no metallic leaching or flavor alteration.

    III. Maintenance & 2026 Lifestyle

    FeatureCast IronStainless Steel
    MaintenanceRequires Seasoning (High Effort)Dishwasher Safe (Low Effort)
    WeightHeavy (The “Arm Workout”)Lightweight to Moderate
    LongevityCenturies (Heirloom Quality)Decades (Durable Powerhouse)
    Cooking SurfaceNaturally Non-Stick (over time)Requires oil/technique to prevent sticking

    The Direct Truth

    Peer Insight: I’ll be your supportive but candid AI peer here: don’t let the “heritage” appeal of cast iron blind you to the reality of a 38°C March in India. If you’re already sweating from the humidity, the last thing you want is a 5kg pan that takes 10 minutes to heat up and requires a specific “no-soap” ritual. In 2026, Resilience means flexibility. Use your cast iron for the slow-cooked weekend feast, but keep high-quality tri-ply stainless steel for your everyday, high-speed nutritional needs.

    The Action Footer

    Final Thought: Your kitchen architecture should reflect your Metabolic Goals. If you need more iron, go heavy and rustic. If you need precision and easy cleanup, go sleek and steel.

  • Air Fryer vs. Convection Oven: The 2026 Nutritional Resilience Guide

    Air Fryer vs. Convection Oven: The 2026 Nutritional Resilience Guide

    TL;DR / Summary Block

    Quick Summary: In 2026, the “Air Fryer vs. Convection Oven” choice has moved from simple convenience to a strategic tool for Nutritional Resilience.

    • Air Fryers: The “Rapid Response” tool. Best for 85% oil reduction, instant preheating, and preserving heat-sensitive vitamins (B and C) through speed.
    • Convection Ovens: The “Volume & Versatility” tool. Superior for even roasting, large-batch meal prep, and flavor depth in complex dishes.
    • 2026 Tech Trend: AI-driven sensors now prevent overcooking in both, but air fryers remain the king of energy efficiency for small households.

    The Hook

    It is Thursday, March 26, 2026. As we navigate a world where our kitchens are becoming “sentient partners” in our wellness journey, the debate between the air fryer and the convection oven has reached a fever pitch. With early-season heatwaves making us reluctant to heat up the entire house, and a growing focus on “bio-hacking” our meals for maximum nutrient density, which appliance deserves the prime spot in your “appliance garage”?


    The Modular Body

    I. The Science of the “Super-Convection”

    Both appliances use fans to circulate hot air, but the intensity of the “Super-Convection” in an air fryer changes the chemistry of your food.

    • Air Fryers: Use a high-velocity fan placed directly above a concentrated heating element. This creates the “Air Frying” effect—extracting moisture from the surface to mimic deep-frying without the trans-fats.
    • Convection Ovens: Use a fan-exhaust system to distribute heat evenly. While slower, this prevents the “hot spots” found in traditional ovens, making it the gold standard for roasting a whole chicken or baking artisan sourdough.

    II. The Nutritional Resilience Formula ($N_r$)

    To determine the “Health Value” of your cooking method, we can model the Nutritional Resilience Index. This formula balances Nutrient Retention ($R$), Oil Reduction ($O$), and the prevention of harmful compounds like Acrylamide ($A$):

    $$N_r = \frac{R \times O}{A + 1}$$

    ApplianceNutrient Retention (R)Oil Reduction (O)Risk (A)
    Air FryerHigh (Short exposure)Up to 85%Low (if pre-soaked)
    ConvectionModerate (Long exposure)ModerateVery Low

    III. 2026 Trends: The “Sentient Kitchen”

    By 2026, kitchen technology has pivoted toward Proactive Wellness:

    • Smart Sensors: New models from Prestige and AGARO now feature infrared sensors that monitor the internal temperature of your food, automatically switching to “Eco Mode” or “Keep Warm” to prevent the formation of carcinogens through charring.
    • Hybrid Ovens: Many 2026 wall ovens now include a dedicated “True Air Fry” mode, using a specialized high-speed fan and perforated tray to bridge the gap between both appliances.

    The Direct Truth

    Peer Insight: I’ll be your supportive but candid culinary peer here: don’t let the “health” label on an air fryer blind you. While it reduces oil, cooking starch (like potatoes) at extreme temperatures can still produce Acrylamide. To maximize your $N_r$ score, always soak your potatoes in water for 30 minutes before air frying. In 2026, the most resilient chefs aren’t just choosing a machine; they’re mastering the prep.


    The Action Footer

    Final Thought: If you are a household of 1–2 focused on quick, crispy, high-nutrient snacks, the Air Fryer is your winner. If you are a family focused on batch-cooking and diverse roasting, the Convection Oven is your foundation.